
VPA Young Gardeners
Springtime is one of the most magical times of the year for gardeners. In the Spring of 2020, the VPA wanted to share some of this magic with all the children and families in the village and the surrounding area. This VPA Young Gardeners page was designed to give you some ideas of how to enjoy your garden even more.
Although these projects were primarily designed for the springtime, many of them are perfectly doable all year round.
You can scroll down to see all the projects, or click or tap one the shortcuts here in the…
List of Projects
- Taster: A Home Made Plant Pot
- Project No 1: Garden Treasure Hunt
- Project No 2: Plant Markers
- Project No 3: Miniature Gardens
- Project No 4: A Bean or Sweet Pea Tepee
- Project No 5: A Grass Caterpillar
- Project No 6: Design a Garden
- Project No 7: Make a Bug Hotel
These projects have been carefully put together by a team of us at the VPA to encourage all our children to have fun while learning. Aspects of each project are designed to highlight growing and nutrition, environmental awareness, wildlife and even elements of maths, science, nature and history. With all these tools we hope to encourage a new generation of gardeners who will gain positive attitudes in their lives to health, both physical and mental; and who will learn the relaxation to be found in gardening as well as the productivity and the joy of eating something that they have grown themselves.
Before we get to the main projects, here is a little taster: how to make…
A Home Made Plant Pot

This is a pattern for a home made pot to plant seeds in – a mini-project that the children could do. Here’s what the pattern looks like:
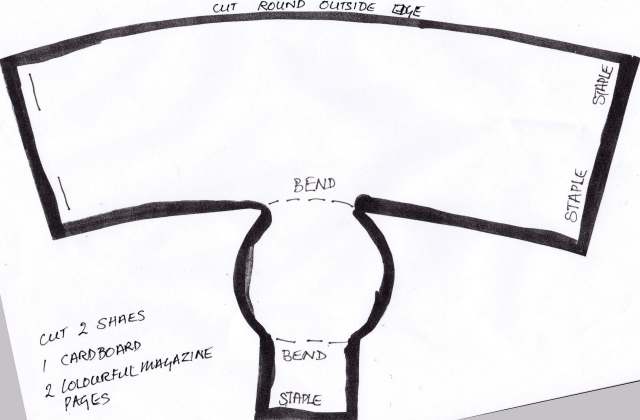
Just cut, bend and staple as shown. You can download a full sized PDF version of the pattern by clicking here:
Fun to do, and useful too!
Click or tap here to go up to the List of Projects
Now here is the first proper project: a Garden Treasure Hunt.
Project No 1: Garden Treasure Hunt
Project No 1: Garden Treasure Hunt
Under 5’s
If you are under 5 years old we would like you to find an example of each item on the list below, tick it off on the list and then draw for us a picture of one of the items you have found.
5-10 Years
If you have had your birthday and are five years old we would like you to find each item on the list too and tick them off on your sheet. We would like you to either draw or photograph each example you have found and send us the one of which you are most proud.
10-15 Years
If you are 10 years of age and over but not yet 16 years old we would like you to find all the items on the list, draw them or photograph them and then find out three interesting facts about each of the items you have found.
And then…
When you have found all the items on the list send us a picture of your finished sheet and there will be points for each one completed. There will be a prize awarded at the Summer Show for the person with the most points in each age group.
So here’s the list…


Have fun and good luck.
We hope you enjoy doing this little hunt. There is no real time limit on this as long as we have the results before the Summer Show.
The VPA Young Gardeners Team
April 2020
You can contact us at young.gardeners@lgvpa.org
Click or tap here to go up to the List of Projects
Project No 2: Plant Markers
Project No 2: Plant Markers
Identifying plants in the garden is often difficult as many of them look alike with similar leaves or flowers. Having colourful plant markers is a good way to help and it might stop us eating a plant that we should not be eating or it might help us avoid digging up something we want to keep.
You can make markers from lots of things and this is a project where you can recycle things too.


You could paint any of the following: Lolly sticks, wooden spoons, any old cutlery, strips of plastic cut from old bottles or cartons or paint stones like the ones above. Have some fun with this.

You could cut out vegetable shapes from craft foam and mount them on sticks.

Air dried clay can be used, and you could impress patterns into it to make attractive markers. Make sure that you seal them with glaze or varnish to help make them waterproof.
You might like to try all these methods or just one, it doesn’t matter but do send us a picture of your handiwork at young.gardeners@lgvpa.org. Do have some fun with this but remember, there will be points to win to go towards the ultimate prize given at the Summer Show.
The VPA Young Gardeners Team
April 2020
You can contact us at young.gardeners@lgvpa.org
Click or tap here to go up to the List of Projects
Project No 3: Miniature Garden
Project No 3: Miniature Garden
Make a miniature garden for faires or dinosaurs! These miniature gardens are really fun to make and you can use absolutely anything you want.

You will need a tray or bowl or anything you can think of that is flat, even a saucer if you don’t have anything else. It is a good idea to draw a little plan of how you want your garden to be. You won’t actually need much earth because you can use moss, gravel, sand, glass beads, twigs, tiny plants – they might need a little earth to keep them going. You can use dolls house furniture; tin foil for a water effect and any other props you would like to add.


If you are going to make a dinosaur garden, you will have to find plants which look as if they would have been growing when the dinosaurs roamed the earth. Ferns or succulent plants might give you the right setting for your dinosaurs.


Whatever you choose to do, please take a photo of the finished garden and send it to us at young.gardeners@lgvpa.org together with your name and age. Don’t forget this is something that you can go on playing with all summer. You can add to it or change it but as long as you keep it watered it should survive.


The VPA Young Gardeners Team
May 2020
You can contact us at young.gardeners@lgvpa.org
Click or tap here to go up to the List of Projects
Project No 4: A Bean or Sweet Pea Tepee
Project No 4: A Bean or Sweet Pea Tepee
This is really a project for all the family.
First of all you will need to find a space in the garden where you can mark out a circle roughly 1 to 2 metres in diameter depending on how big you want the tepee to be. Measure a piece of string just over half the length of your chosen diameter. Put a wooden peg roughly in the middle of the area you are going to mark and tie the string to it. Walk out from your peg keeping the string tight behind you. We used an old plastic bottle with some dry sand in it. By tying the string to the bottle top you can up-end the bottle and use the trickle of sand to mark the circle as you walk round. This should give you a more or less perfect circle.

The next step is to arrange your poles in a tepee shape, binding them tightly at the top – this is where a tall Mum or Dad is useful.
At intervals of about 15-20 cm plant either climbing beans or sweet peas or any other climbing plant you may have. Keep the plants well-watered and you will soon see the sides of the tepee growing and filling in.
When the tepee is completely covered you can put a rug or blanket on the floor inside it and you will have your own space to sit in to play, read, draw or just sit quietly. If you have a brother or sister and your garden is big enough perhaps your family could make two tepees, either together or in different parts of the garden.

We would love to see photos of your tepee so don’t forget to send them in to us at young.gardeners@lgvpa.org not forgetting to let us have your name and age.
The VPA Young Gardeners Team
May 2020
You can contact us at young.gardeners@lgvpa.org
Click or tap here to go up to the List of Projects
Project No 5: A Grass Caterpillar
Project No 5: A Grass Caterpillar
Make a grass caterpillar! This is fun whatever age you are. If you are under 10 you might need a little help.
You will need:-
- A bucket, or another container for mixing
- Soil or multipurpose compost
- Quick growing grass seed
- An old pair of tights
- Scissors
- A bin bag (or you could use your bucket instead)
- String or rubber bands to make the body sections of the caterpillar
- A selection of pipe cleaners, googly eyes and anything else you would like to decorate your caterpillar with
- Plastic tray to grow your caterpillar on

First of all cut the legs off the tights. You can decide how long you want your caterpillar to be.
Next take your bucket or other container and mix the grass seed with the growing medium you have chosen. Take one of the legs and begin to pack the compost into it, packing it in quite tightly. When it is full, tie a knot in the end to keep all the soil in place and then tie string round him to make sections every few cm.

Pop him into the bucket, or a bin bag if your mixing container isn’t big enough, and cover him with water, giving him a good soak. Leave him overnight to get all the compost wetted right through.

In the morning take him out of the bag and put your caterpillar in a sunny place outside…

…but make sure that you keep it watered every day for about 7-10 days by which time your caterpillar will have begun to grow bright green hair!
Now you can put on eyes, legs and any other decoration that you would like and your new pet is ready. Keep him well watered and you can give him a hair cut from time to time with some scissors.


We are looking forward to seeing all your different caterpillars and hope that you will have fun growing your own pet. Send us lots of pictures please to young.gardeners@lgvpa.org, not forgetting to let us know your name and how old you are and, who knows, you might be a winner at the Summer Show.
The VPA Young Gardeners Team
May 2020
You can contact us at young.gardeners@lgvpa.org
Click or tap here to go up to the List of Projects
Project No 6: Design a Garden
Project No 6: Design a Garden
Yes, design your own garden! Whatever age you are, you can do this…so read on!
If you are under 5 years old we would like you to draw a picture of how you would like your own garden to be.
We would like 6-10 year olds to draw a plan of how you would like a garden to be. You can do this by drawing, painting and using cut out pictures from magazines or seed catalogues.
If you are 11-16 years old we are looking for a plan of how the garden should look and a list of the plants that you would like to see growing in it. We would like you to include some pathways, some trees and a special feature like a pond or a seating area or whatever you would really like. Some of us thought it would be really nice to have a summerhouse in the garden so we could catch the afternoon sun when we sit down to our cups of tea.


As usual we would like you to send photos of your hard work, giving your name and your age. You should send it to young.gardeners@lgvpa.org
The VPA Young Gardeners Team
May 2020
You can contact us at young.gardeners@lgvpa.org
Click or tap here to go up to the List of Projects
Project No 7: Make a Bug Hotel
Project No 7: Make a Bug Hotel
The Last Project…for now!
A bug hotel is useful as well as fun. It will help the beneficial insects that visit the garden by providing places for them to lay eggs, avoid predators and overwinter in the dry and the warm. Our bug hotel is a very simple one that anyone can have a go at making.
To make your bug hotel you will need:-
- 1 litre plastic bottle
- Twigs or bamboo canes
- Corrugated cardboard or straw
- Fir cones if you can get them
- Some string
- Scissors

First of all you need to cut the bottom off the bottle. You may need the help of an adult to do this as it is quite difficult to cut through plastic. Keep the screw top on the end of your bottle as you might need to drain any water that has collected out of the hotel from time to time.*
* If you keep the end of your bottle you could use it for a saucer for a flower pot.
Fix your string at each end of the bottle so that you can hang it up in a tree or hedge. If you wanted to you could tuck it into some plants at ground level where you would get different mini beasts using it.
Using the cardboard, tuck the first layer into the bottle and then begin to fill it with whatever you have chosen to use. If you are going to use bamboo canes which are hollow, you might have to ask an adult to cut them into the right lengths for your bottle. Make sure that the bottle is fairly well filled with the various materials and then you are ready for your insects to move in.


If you like to help the insects in your garden, there is also a plant you can grow called Phlomis russeliana. It has ruffled seed pods at intervals around the flower stem which, when the seeds are gone, are often used by ladybirds to overwinter in.
As usual we would like you to send photos of your hard work, giving your name and your age. You should send it to young.gardeners@lgvpa.org.
This is the last project, at least for now. We hope everyone has enjoyed the projects and we look forward to seeing all your photographs of the completed projects.
The VPA Young Gardeners Team
May 2020
You can contact us at young.gardeners@lgvpa.org